Curly hair coach helping you better understand your naturally curly hair through easy-to-follow tutorials, science-based haircare tips, and problem-solving.
Are You Styling for the Wrong Finish? Soft vs. Rough Finish Split Test
|
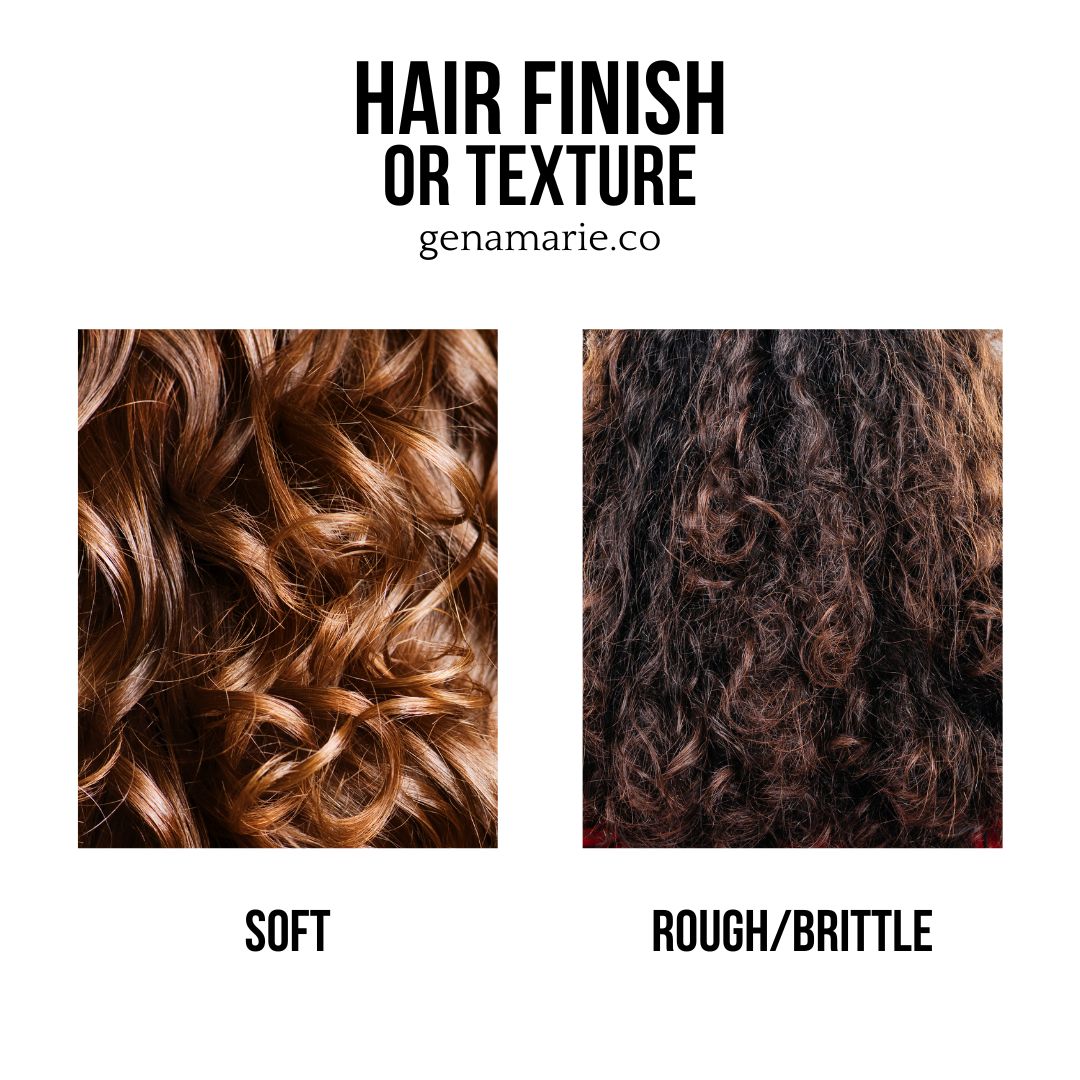
If your curls are weighed down, falling flat, and won’t last — or they feel dry, brittle, and hard to manage — you might be styling for the wrong finish type. Not the wrong curl type. Not the wrong porosity. The wrong finish type. This post walks through a side-by-side split test I filmed on my own hair: one side styled for soft finish, one side styled for rough finish, same technique on both, two completely different product combos. I’ll show you what a balanced routine looks like for each finish type, what the results looked like at day one and day two, and how to figure out which routine applies to your hair. Before we get into the steps — what this routine is really doing is zooming in on the prep and gel step to dial in the moisture and hold balance for both finish types. If you’re not familiar with the Moisture–Hold Balance Framework, that’s the foundation of everything I teach when it comes to building a curly hair routine that lasts. I’d recommend starting there first, then coming back to this routine. What Is Hair Finish — And How Do You Tell Which One You Have?The term hair finish was coined by Barbie Delle — if you don’t follow her, she makes excellent curly hair contThe term hair finish was coined by Barbie Delle — if you don’t follow her, she makes excellent curly hair content and you can find her on Instagram at @itsbarbiedelle. I love this term because it focuses on how your hair actually looks and feels, which is far easier to determine than abstract concepts like porosity levels or strand width measurements. The way I think about hair finish is a combination of three things:
You don’t need to test each of these individually. Your finish type is the combined result of all three, and you can read it directly from how your hair behaves.
Soft Finish HairUse these characteristics to identify whether you have soft finish hair:
Rough Finish HairUse these characteristics to identify whether you have rough finish hair:
Medium FinishYou can fall somewhere between soft and rough — that’s where I land, somewhere between medium and rough. I’ll explain what that meant for my results. The Two Routines: What I Used and WhyBoth sides used the exact same styling technique. The only variables that changed were the prep product and the gel. The products I chose are specifically selected to build a balanced moisture and hold routine for each finish type — this is the Moisture–Hold Balance Framework applied in practice.
One important note: if you currently use one of these products for the opposite finish type, that doesn’t automatically mean you need to stop. There is overlap. What matters most is the gel you’re using, not the prep. I’ll explain why as we go through each step. Step 1: PrepThe prep step controls the moisture content in your hair and the amount of slip you have going into styling. This step sets up everything that comes after it. A. Soft Finish — Living Proof Leave-In Conditioning SprayI chose this for the soft finish side because it is one of the most lightweight prep products I own. Look at the texture — it’s clear, with just a little slip to it. Clear, water-based sprays tend to be more lightweight compared to something creamy or milky, and that’s an easy visual cue when evaluating your own products. It’s relatively low in conditioning ingredients, which means it provides slip without over-softening the hair. Spray it into your hands and apply starting at the ends, working up toward the top. If you have mixed texture throughout your hair, focus the product where you need it most. For me, that’s my top section and the front area around my hairline, which tends to be the most brittle and dry.
Living Proof Leave-In Conditioning Spray For soft finish hair: Avoid prep products with a lot of silicones or heavy conditioning ingredients. That alone can set your hair up to be too soft before you’ve even touched the gel. B. Rough Finish — Curlsmith Miracle ShieldOn the rough finish side, I used the Curlsmith Miracle Shield — a heat protectant and prep product. Notice the texture difference: it’s still a lightweight spray, but it’s white and milky rather than clear. That indicates a bit more conditioning. Both products provide good slip, but the Miracle Shield leaves the hair feeling just slightly softer. Apply it the same way — ends first, working up.
Curlsmith Miracle Shield Heat Protection Spray For rough finish hair: You can handle a bit more conditioning at this step. If your hair tends to feel very brittle or inflexible when styling, this is where you can give it a little more support. After applying prep on both sides, I brushed through with my Tangle Teezer to make sure the product was evenly distributed, then ran my hands through so the hair wasn’t stuck to my scalp before sectioning. I also used a spray bottle to keep the hair wet throughout, and sectioned with clips to work through the hair in manageable pieces.
Tangle Teezer Naturally Curly Detangling Brush
Bouclème Flairosol Mist Spray Bottle
Bounce Curl Volume Root Clips Step 2: Gel ApplicationThis is the step where the two routines actually diverge in a meaningful way. The gel is what matters most for finish type — more than anything else in the routine. I evaluate gels on three axes: hold level, moisture level, and slip versus texture (or grit). Both gels used here have strong, long-lasting hold. What’s completely different is everything else. A. Soft Finish — Curlsmith Fragrance-Free Strong Hold GelThis gel is thick, low in moisture, and provides texture and grit. That slightly grippy feeling in the hair is exactly what soft finish hair needs — it gives the strands something to hold onto. Because it’s thick and concentrated, use less of it. Add water to your palms to help it spread evenly, which also prevents over-application. The water-to-gel ratio matters here: you need enough water in the hair to distribute the gel, but you’re relying on the water to help with clumping since the gel itself isn’t providing much moisture or slip. When you rake it through, you probably won’t feel as much slip and softness as you’re used to. That’s fine. It doesn’t mean your hair is dry or that you’re harming it. Keep going.
Curlsmith Fragrance-Free Strong Hold Gel B. Rough Finish — Ouidad Advanced Climate Control Stronger Hold GelThis gel is the near opposite in almost every way except hold level. It’s moisturizing, has a lot of slip, and provides no texture or grit. It’s runny and liquidy, so there’s no need to add water to your palms — the moisture is built into the gel. Use more of it because of its consistency. Because the moisture is built in, you also don’t need as much water in your hair on this side. Your hair should still be wet, but you don’t need to dilute this gel the way you do with the Curlsmith. One thing you’ll notice immediately: more clumping on this side, even without extra water. That’s the higher moisture content at work. On the Curlsmith side, you have to actively create clumps with your hands and water. On the Ouidad side, you’ll likely need to actively separate them.
Ouidad Advanced Climate Control Heat & Humidity Stronger Hold Gel If you’re not getting a cast with the Ouidad gel: Try the microplopping step below and then a second light layer of gel on top. That combination usually resolves it. Step 3: Styling Through SectionsBoth sides use the same styling technique — level two medium manipulation, which for my curl pattern means a moderate amount of encouragement to tame frizz and bring curls up to their full potential. If you want to understand what level is right for your curl pattern, I go into this in detail in my How to Make Your Hair Look Its Curliest. For the top section on both sides, I did some finger coiling to encourage root curl and build volume. Because the hair was split down the middle for this test, directing the hair back and lifting the roots was especially important to prevent the part from flattening everything out. Real-time observations during styling:
Step 4: Microplopping (Optional)Microplopping is optional, but worth doing if your hair takes a while to dry or if you used a lot of water during styling. Using a smooth flat-weave towel — I use the Hair Repair Towel, which has a completely smooth texture that doesn’t create frizz the way traditional microfiber can — gently scrunch out some of the excess water. Use separate sections of the towel on each side to avoid mixing the two gels.
Hair RePear Premium Cotton Hair Towel, Not Dyed After microplopping, go back in with a light glaze of gel on both sides:
Step 5: DiffusingBoth sides use the same diffusing routine. Your finish type — soft or rough — doesn’t determine your diffusing technique. Your desired results do. I use the Curlsmith Diffrizion with the XXL diffuser. The large diffuser head dries my hair in about 10 minutes, and the design allows me to scrunch diffuse effectively without the hair spilling over the sides. Technique: start the front section upside down for maximum shrinkage and lift, then work around the head side to side, targeting the midsection and roots with the diffuser prongs.
Curlsmith Defrizzion Dryer & XL Diffuser – Travel Edition For soft finish hair currently air drying: Air drying tends to cause elongation and reduces longevity. The weight of wet hair pulls the curl down while it dries slowly. Diffusing with gentle heat sets your curl pattern in place and gives you significantly better hold and longevity. It’s not damaging when done correctly, especially with a heat protectant already applied. Step 6: Scrunching Out the CastOnce the hair is fully dry, scrunch out the cast and fluff the roots. After breaking the cast, the texture differences between the two sides became very clear in how the hair felt: Ouidad side: Softer, more silky feeling when scrunching. More of a clean, defined, slightly wet look. Less texture sensation — which is exactly what rough finish hair needs. Curlsmith side: More texture and that slightly producty feeling when scrunching — which is normal with this gel. The volume that came out after fluffing was noticeably fuller. However, I did notice significantly more frizz and a duller appearance on this side compared to my typical results with this gel. I believe that was primarily because I didn’t apply quite enough gel — it’s possible my hair also just needed more moisture, but the under-application is the more likely culprit. Day One Results:After scrunching out the cast, both sides looked defined and held their shape well. The Ouidad side had more of a wet, defined look — that’s characteristic of higher moisture gels. The Curlsmith side had more volume and texture, but also more frizz than I usually get with that gel, which I attribute to not using quite enough. When I apply the right amount, I get a lot of definition and very little frizz — the difference is significant. Because I have medium to rough finish hair, I can do well with both routines. The main difference shows up in volume and feel rather than dramatic curl pattern changes. If your hair is genuinely on the soft finish end, the difference in longevity between these two routines would be more dramatic — the Curlsmith gel would hold significantly longer. One thing worth noting: frizz doesn’t always mean your hair is dry or that you need more moisture. A lot of the time it means you need more gel or more even coverage. Don’t switch products after one wash day where the application was off.
Day Two ResultsDay two is where you can really see whether your routine is balanced for your hair’s finish type. Here’s what an imbalanced routine typically looks like the next day, by finish type: Signs of imbalance for soft finish hair:
Signs of imbalance for rough finish hair:
Both soft and rough finish hair can experience either extreme, but these are the most common patterns for each. For my results, both sides held up well. I did have more frizz and a slightly duller look on the Curlsmith side from under-applying the gel. Worth noting: with both gels, day two tends to look even better than day one — some moisture evaporates overnight and the curls soften up, which I prefer. I only did a dry refresh — just finger coiling any frizz back in with dry hands. Curlsmith Side (Soft Finish Routine) More fuzziness than usual from the under-application. Refreshing felt more resistant, which is normal with a texturizing gel — don’t expect slip when you add water, but you can still refresh gently. Going into day three, a small amount of gel mixed with water will tame any fuzziness. Ouidad Side (Rough Finish Routine) Still soft and silky. Slip returned immediately with water, though I didn’t need it. Going into day three, water alone would probably be enough. The higher moisture content makes refreshing gentler and more forgiving. Product Combos by Finish TypeThe key principle: it’s not that you can’t use a product designed for the opposite finish type. It’s about how you build the combination. You can certainly use any of these or mix and match depending on how much slip or texture you prefer in your routine. Soft Finish Combos
Rough Finish Combos
Still Struggling to Dial In Your Moisture and Hold?This is exactly the kind of work I do with curl coaching clients — figuring out the right product balance for their specific hair, dialing in water-to-gel ratio, and watching them style in real time so I can catch the small adjustments that make a big difference. Sometimes it’s more gel. Sometimes it’s more water. Sometimes it’s the product profile. It’s rarely just one thing, and it can be difficult to identify on your own if you’re not trained to spot those differences. If you’ve tried dialing in your routine and you’re still not getting consistent results, I’d love to have you in my Curl Coaching Program. If you want to go deeper on moisture and hold balance before anything else, start with the Moisture–Hold Balance Framework — it’s the foundation of everything I teach when it comes to building a curly hair routine that actually lasts.
|


Gena Marie
Curly hair coach helping you better understand your naturally curly hair through easy-to-follow tutorials, science-based haircare tips, and problem-solving.
If your curls are still frizzy and not lasting even though you’ve been doing everything you were told, the advice might be the problem. These are five pieces of popular curl advice that could be working against your hold — and by extension, your frizz, your definition, and how long your style lasts. This advice isn’t necessarily wrong. But nobody explains what it costs. Once you understand that, you have control. The Moisture-Hold Balance: Why Hold Controls Everything Hold is what controls...
Your styling technique could be the reason your curls are drying flat, stretched out, and stuck to your head — not your products, not your curl pattern, not your density. As a Curl Coach, I watch my clients style in real time and see the same problem consistently: hair compressed into one flat sheet instead of stacking on top of itself. Curls defined at the ends, but the root area stuck to the head with no space and no lift. The Curl Stacking Method fixes that. Style your hair so curls stack...
If your waves or loose curls fall flat every summer — losing definition by midday, never lasting past wash day — this routine is built specifically for you. While I don’t have wavy hair myself, I’ve coached hundreds of clients with all hair types, from 2A to 3C. I’m familiar with the struggles and problems that wavy and loose curls experience, and the patterns are consistent. In my coaching program, we’ve tested and proven that my Moisture-Hold Balance Framework and Strong Hold Method work....