Curly hair coach helping you better understand your naturally curly hair through easy-to-follow tutorials, science-based haircare tips, and problem-solving.
Why Your Curls Stopped Curling (and How to Get Them Back)
|
You used to get great curls. Now they look stretched out, less defined, and you can’t figure out why — and nothing you’ve tried seems to fix it. If that sounds familiar, you’re not alone. This is one of the most common things new clients come to me about. And the good news is that most of the time, there’s a fixable reason. In this post, I’m going to walk you through the same diagnostic framework I use with new Curl Coaching clients — four controllable causes to check, in the exact order I’d troubleshoot with you, plus how to tell if it’s something you can’t fully control. #1 — You’re Overdue for a Reset Wash DayThe first thing I check with any new client is their wash day schedule and rotation. It’s the most common cause of curls that stop curling — and it’s also the fastest fix. Most people see a significant improvement in their curls after just one reset wash day. ❌ Signs to look for
✅ Reset your wash dayStack everything into one wash day in this order: clarify → bond-build → shampoo → condition.
One important note: bond-building is not the same as deep conditioning. If your hair is already feeling limp and soft, adding more conditioning is going to make it worse. You need those bond-building ingredients. Deep conditioner has its place for dry, brittle hair — but it’s not a substitute for bond-building when your curl structure is weakened.
Ouidad Water Works Clarifying Shampoo
Curlsmith Bond Curl Rehab Salve ✅ Build a rotation that worksA reset wash day isn’t a one-time fix — it needs to be part of a regular schedule.
#2 — Your Products Are Out of BalanceIf you’ve reset your wash day and your curls still aren’t coming back, the next place to look is your products. And this isn’t about your products “stopping working” or your hair “getting used to them.” It’s usually that your balance has shifted, or you’re combining products that aren’t working together for your hair’s current needs. ❌ Signs to look for
✅ Balance moisture vs. holdEvery curly hair product contains conditioning ingredients — and styling products add hold on top of that. These two things work against each other. The more moisture you add, the less hold you’re going to get out of your routine.
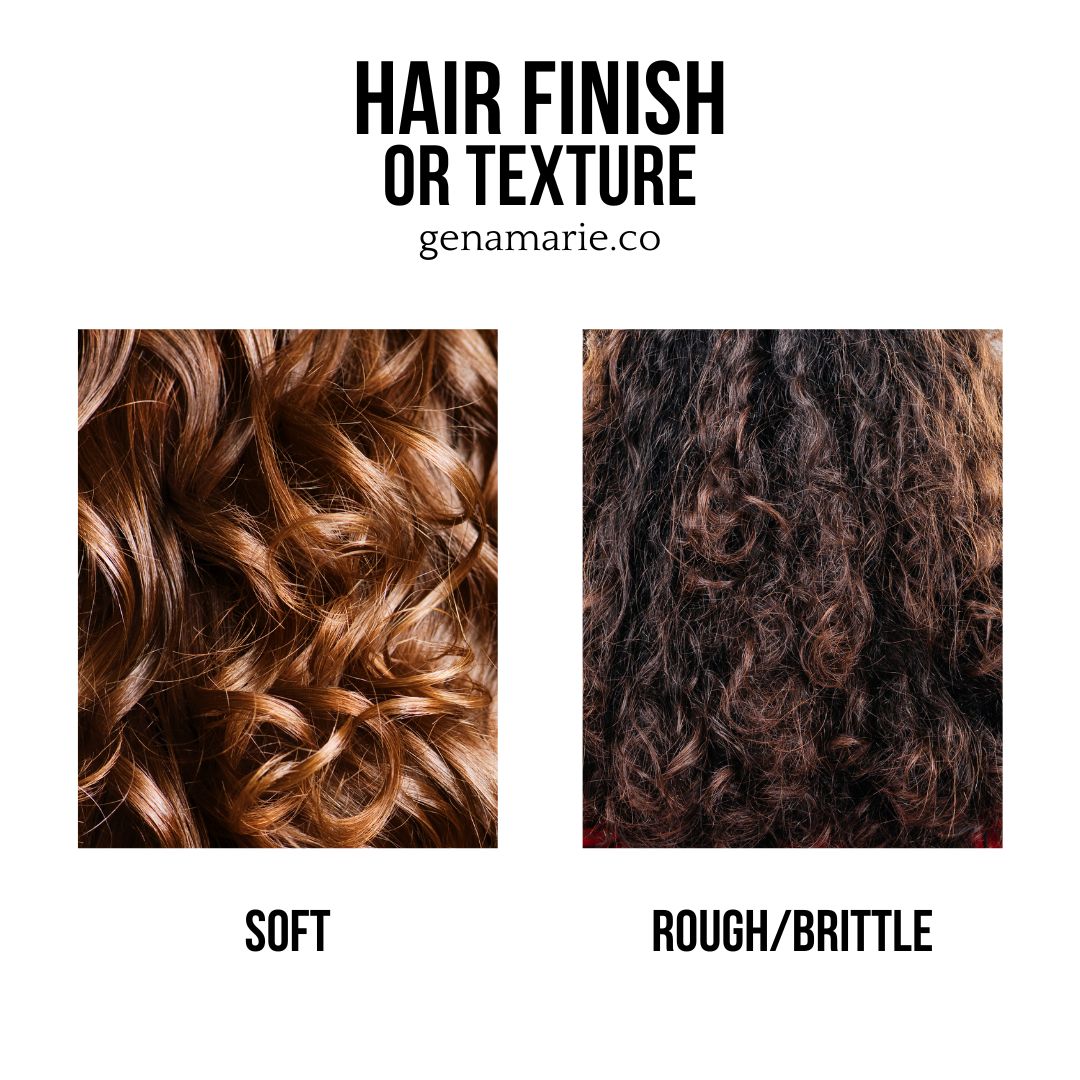
✅ Balance softness vs. textureThe softer your hair is, the harder it is to hold a curl shape. A lot of curl styling products are high in slip and conditioning ingredients — which can actually reduce structure if your hair doesn’t need the extra softness.
The first question I ask every new client is this: does your hair fall easily and get weighed down, or does it typically hold its shape and withstand moisture? That one question tells me almost everything I need to know to help someone pick the right products — and it’s the same question you should be asking yourself before reaching for anything new. Products that illustrate the difference:Two gels I recommend most often are the Ouidad Advanced Climate Control Stronger Hold Gel and the Curlsmith Fragrance-Free Strong Hold Gel — and they are wildly different from each other.
Ouidad Advanced Climate Control Heat & Humidity Stronger Hold Gel
Curlsmith Fragrance-Free Strong Hold Gel #3 — Your Styling and Diffusing Needs RefiningIf your products are balanced and your curls still aren’t forming, the next place to look is your styling and diffusing technique. This is where a lot of people are leaving curl on the table without realizing it — your products can be perfect and you can still lose your curl right here. ❌ Signs to look for
✅ Matching your styling methods to your curl patternOne of the frameworks I teach in my Beginner Curl Series is what I call the Styling Ladder — essentially, different levels of curl manipulation matched to your curl pattern. Getting this match right is one of the biggest differences between hair that reaches its full potential and hair that doesn’t.
Note: Make sure your hair isn’t too wet when applying products — too much water dilutes hold and stretches the curl before it has a chance to form. Pretty much any curl type can use a brush, but almost everyone I watch style is over-clumping. When you over-clump, you force curls into a more elongated pattern, or group curls that don’t naturally want to go together — creating a heavy, droopy look.
Tangle Teezer Naturally Curly Detangling Brush Bounce Curl Slick-Dense Define EdgeLift Brush ✅ Diffuse over air dry to lock in curl patternIf you’re air drying and your curls are falling or elongating, gravity is working against you. When wet curls hang without any help to spring up, they elongate — especially with product weight added. The way your hair dries is the way it stays.
Diffusing takes practice. Check out my diffusing video to see the techniques in action.
Curlsmith Defrizzion Hair Dryer & XXL Diffuser #4 — Damage or Overdue Trims Are Holding Your Curl BackIf your wash day, products, styling, and diffusing are all dialed in and your curls still aren’t coming back, we need to look at hair health. Damage isn’t just dryness or frizz — damage means weakened structure, and weakened structure means a looser curl pattern. ❌ Signs of damage
❌ Signs you’re overdue for a trim
✅ How to repair damage & maintain healthy curlsStart here regardless of how much damage you have:
Then address your ends:
Curlsmith Miracle Shield Heat Protection Spray Progress is slower when your hair is compromised — consistency over weeks and months is what works. Check out my Damage Recovery Plan, including how to maintain your length while you recover. #5 — Your Curl Pattern May Have Genuinely ChangedIf you’ve worked through all four of these and your curls still aren’t where they were, that tells us something specific. This is that one thing you can’t fully control — and it’s the last thing we rule out, not the first. ❌ Signs to look for:
Internal factors you can’t fully control can shift your curl pattern at the structural level:
This is more common than most people realize. I did a full deep dive on this — including my own hair history and examples from this community — if you want to understand why it happens and what it can look like over time, you can watch that here. ✅ Here’s what you need to do to fix itThe fix here is a mindset and strategy shift — three things:
Even when you can’t control why your hair changed, you can absolutely control how well you care for and style it. That is enough. Getting Help If You Can’t Figure It OutIf you’ve gone through this and you’re still not sure which of these four things is your issue, or your pattern has genuinely changed and you need help adapting to it, that’s exactly what I do in my Curl Coaching Program. I look at your specific hair. I watch you style, diffuse, and refresh in real time so I can spot the things that are hard to self-diagnose — the brush angle, the diffuser positioning, the points in your routine where things are breaking down. We work through it together over three to twelve months, and the goal isn’t just to hand you a routine. It’s to teach you how to think like a coach yourself, so you can troubleshoot your own hair from here on out. My summer cohort is currently open for early enrollment, and we kick off June 1st. If you want in, you can register here. We’ll talk through whether it’s a good fit. If you’d rather work through it yourself, my Beginner Curl Series covers a lot of what I mentioned in this video in much more depth — the styling ladder, wash day rotation, diffusing technique, and more. It’s a great place to start if you’re working through these things on your own.
|


Gena Marie
Curly hair coach helping you better understand your naturally curly hair through easy-to-follow tutorials, science-based haircare tips, and problem-solving.
Your styling technique could be the reason your curls are drying flat, stretched out, and stuck to your head — not your products, not your curl pattern, not your density. As a Curl Coach, I watch my clients style in real time and see the same problem consistently: hair compressed into one flat sheet instead of stacking on top of itself. Curls defined at the ends, but the root area stuck to the head with no space and no lift. The Curl Stacking Method fixes that. Style your hair so curls stack...
If your waves or loose curls fall flat every summer — losing definition by midday, never lasting past wash day — this routine is built specifically for you. While I don’t have wavy hair myself, I’ve coached hundreds of clients with all hair types, from 2A to 3C. I’m familiar with the struggles and problems that wavy and loose curls experience, and the patterns are consistent. In my coaching program, we’ve tested and proven that my Moisture-Hold Balance Framework and Strong Hold Method work....
You read the reviews online. One person says a product completely changed their hair. Someone else says it’s the worst thing they’ve ever tried. And you’re left with no idea whether it will actually work for your hair. That disconnect is not a coincidence — and it’s not your fault. It’s a combination of misleading marketing, mismatched expectations, and the simple fact that products work very differently depending on your hair type, your needs, and what you’re pairing them with. As a Curl...